Getting started with
Pedestrian Comfort Analysis
Introduction to Pedestrian Comfort Analysis app
What is Computational Wind Engineering?
Wind engineering is a subset of mechanical engineering, structural engineering, meteorology, and applied physics to analyze the effects of wind in the natural and the built environment. It involves studies of the possible damage, inconvenience or benefits which may result from the wind. Computational Wind Engineering (CWE) is the application of computational methods to wind engineering problems. Computational Fluid Dynamics (CFD) has constituted a major part of CWE over the years.
May problems in wind engineering can be tackled by one of three approaches, or a combination of these: 1) on-site measurement, 2) reduced-scale wind tunnel measurements or 3) numerical simulation based on CFD. Each of these methods has their own pros and cons. The major disadvantage of on-site and wind tunnel measurement is that usually a point data values are obtained. These methods also involve high initial cost, high running cost. The time required to obtain the design feedback is a major limitation of these methods due to which the study is limited just to a performance prediction rather than considering it as an integral design process.
The popularity of numerical simulation based on CFD is increasing due to its ability to generate more accurate and more detailed information about wind behavior in and around the building. Due to the availability of high-speed computing, the turn-around time is reduced from days to hours which opens new possibilities of CFD based optimization of building design.
Computational Fluid Dynamics and Wind Engineering
Computational Fluid Dynamics or simply CFD is an art/method/science/technique of solving mathematical equations governing different physics including a flow of fluid, a flow of heat, chemical reactions, phase change and many other phenomena. When applied to wind engineering, it's about the solution of air movement equations in and around the building. CFD helps architects, building designers, and urban planner to understand the wind behavior and design better building mass model.

Traditionally, CFD is considered as three step processes, viz. pre-processing, solving and post-processing the results. In case of wind engineering, pre-processing involves creating 3D CAD model of a building mass, preparing CAD model for CFD meshing, creating a mesh in and around the building, creating a solution setup for air movement, a solution of airflow equations and visualization and interpretation of results generated by the solver. CFD is considered as one of the complex technique to learn and use in wind engineering. Unlike other CFD applications, CFD in wind engineering is not only about these three steps but also involves understanding local wind conditions, conducting different direction wind studies and understanding of multiple direction / velocity wind effects in and around the building. Few of the major obstacles for using CFD in wind engineering includes the size of the domain, compute power required for the solution, the requirement of considering multiple conditions and collectively understanding its effect on building design.
Pedestrian Comfort Analysis
A concern towards the quality of life in an urban environment has increased in recent years. For architects, urban planners and designers, outdoor comfort and safety are one of the important design aspects due to its direct relation with quality of urban life.
The construction of a building inevitably changes the microclimate in its vicinity. Near high-rise buildings, high wind velocities are often introduced at a pedestrian level that can be experienced as uncomfortable or even dangerous. Even if the overall wind conditions are favorable for pedestrian activities, the introduction of building restricts the wind movement which leads to different wind conditions around the building. Therefore, pedestrian-level wind conditions are one of the first microclimatic issues to be considered in modern city planning and building design. Pedestrian comfort analysis is the study of wind conditions around the building for different pedestrian activities.
Conducting a pedestrian comfort analysis in an urban environment is a multi-fold problem. It consists of combining a statistical meteorological data with building aerodynamic information and comfort criteria. Meteorological data collected from weather condition represents the uninterrupted / undisturbed wind conditions. Presence of building alters the wind conditions around the building. Building aerodynamic study helps to understand the modification in wind conditions due to the presence of the building. These modified conditions are then evaluated for different pedestrian activities to evaluate pedestrian comfort conditions.
What is Pedestrian Comfort Analysis app?
In a traditional way, pedestrian comfort analysis using CFD involves the following process:
- Create a building mass model, creating CFD domain around building and creating a CFD mesh
- Getting average weather conditions from near-by weather station
- Conducting CFD analysis for number of direction (between 8 to 32)
- Scaling these directional CFD results for individual wind condition from weather station
- Combining the scaled results with selected comfort criteria
- Creating a comfort criteria plot at pedestrian height
The process needs CFD expertise, its compute-intensive and typically takes days to complete.
Pedestrian Comfort Analysis app helps architects, urban planners, and environmental engineers to evaluate the pedestrian comfort with ease. The app only needs a building mass model as an input from a user. The site location can be provided simply by clicking on the integrated map and the weather data is automatically extracted based on the location. A comfort criterion can be selected from a number of comfort criteria provided in the app. The solution accuracy can the changed anywhere between coarse (4 wind directions) to finest (32 wind directions) accuracy.
All CFD computations are done using cloud computing. The app does not need any high-end local machine and even can be used from mobile / tablet devices. Once the setup is submitted from computation, ready-to-use pedestrian comfort analysis PDF report is generated within hours. The report includes all setup information, comfort plot indicating different comfort conditions and more detailed CFD results.
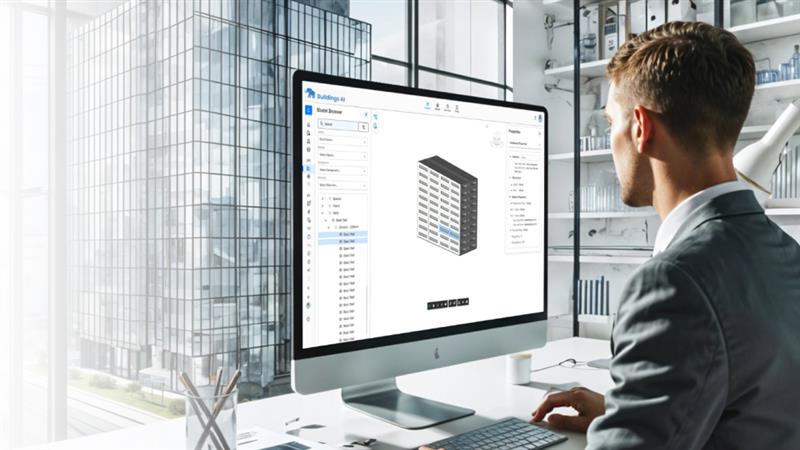
User interface

Following are the major components of Pedestrian Comfort Analysis app interface.
1
Simulation details and help toggle button
:
Access the simulation details, help and support menu. This allows opening the simulation details page. A quick link to help items like getting started guide, video library and forum is given. You can also raise the support ticket for opened simulation.
2
Simulation stage navigation toggle button
:
This button toggles the stage navigation menu of left.
3
Navigation menu for an individual stage
:
A typical simulation includes a number of main stages. Each main stage includes a number of sub-stages. For example, the location and wind condition stage has two sub-stages, location & wind rose and wind conditions for simulation. Navigation menu for an individual stage is available in the left navigation panel. Individual stage menus will change depending on the stage you have opened. For example, in result stage, you can view comfort plot, flow lines, surface pressure, contour plots etc. Clicking on each sub-stage will open the respective sub stage options. This menu follows stage dependency and color coding.
4
Previous & next stage access
:
A quick access link is given to go to previous or next simulation stage. The access to the next stage is deactivated until the current stage is completed. This menu follows stage dependency.
5
Stage quick access
:
Stage quick access is available at bottom of stage navigation panel. This quick access helps to navigate between main simulation stages. This menu follows stage dependency and color coding.
6
View cube
:
Use the View cube to orbit your design or view the design from standard view positions. If you hover on the view cube, you can see a drop-down icon at a bottom right corner with more view options.
7
Model view controls and settings
:
The model view controls contain commands used to zoom, pan, and orbit your design. The display settings control the appearance of the interface and how a model is displayed in the graphics window. You can also take the snapshot of what is displayed in the graphics window.
8
Model click menu
:
Left-click to select the object in the graphics window. Right-click to access the model menu. The model menu contains commands like to isolate, hide selected, show all objects. Left click anywhere in the graphics window to hide the model menu.
9
Results quick access menu
:
Results quick access menu is available when you open the result stage of simulation. This quick access menu helps to navigate to different results without using left navigation panel. Quick access menu contains commands to go to results like comfort plot, flow lines, contour plots etc.
10
Profile and help
:
In profile, you can control your profile and account settings, or use the help menu to continue your learning or get help in troubleshooting. This menu also contains a quick link to the dashboard. Use full-screen icon if you wish to use the app in full-screen mode.

Mobile device modifications

View cube 6 and result quick access 9 menus are not available on mobile and tablet. A profile and help menu 10 is modified for mobile and tablet devices. You will see raise ticket and sign out buttons in the profile and help menu. Model view control and settings 7 menus are also modified and available with fewer options.
Stage dependency and color coding

All the simulation stages are arranged in the sequential way they are executed. Every stage is dependent on the status of its previous stage. If the previous stage is not completed/failed, the stage will not be activated. This helps to complete the simulation stages in a sequential manner and avoid input errors.
The status of every stage/sub-stage is represented by unique colors. Green color indicates running stage, blue color indicates completed stage, black color indicated active stage, light grey color indicated deactivated stage and red color indicated the failed stage.
Create simulation

Start new pedestrian comfort analysis by creating a new simulation.
1
Create new simulation
:
Click "Create New Simulation" button on the dashboard. This will open create new simulation popup. (NOTE: The button will be deactivated in case if you do not have valid app subscription.)
2
Simulation details
:
Provide simulation name and description in given fields. If you have only one app subscription, the app will automatically be selected in template drop-down. In case of multiple app subscriptions, select the app template.
3
Create simulation
:
Click "Create Simulation" button. This will create a new simulation with provided details and open the 3D viewer for further setup.
Building mass model
This is the first step towards running a CFD simulation in Pedestrian Comfort Analysis app. Once a new simulation is created, you will be directed to geometry stage.

Follow below steps to get you geometry in a simulation project.
1
Input CAD model
:
Click "Input CAD Model" in main geometry stage. This will direct you to sub-stage menu for input CAD model.
2
Browse
:
If you have geometry available in your local computer, click "Browse" button. This will open "Upload Local Geometry" dialog. (NOTE : If you have geometry available on cloud storage, provide the link to geometry file and click upload. Currently, only Amazon S3 cloud storage links are supported).
3
Choose a file
:
Click on "Choose a file to upload" button to open a file browser. Select the file and click "Open" in a file browser. The selected file name will appear below the button.
4
Upload
:
Click "Upload" button to upload the file to your simulation. The time required to upload the file will depend on the size of a file. Once the file is uploaded, the 3D viewer will show the geometry and will move to next simulation stage. You can notice that the geometry stage is marked completed (blue color) in stage quick access menu available at bottom of stage navigation panel.
Site location
The accuracy of pedestrian comfort analysis depends on the accuracy of weather data. The user should avoid using single year, Test Reference Year-type (TRY) weather data. No single year can represent the typical long-term weather patterns. The more appropriate method is to use an average weather data over years. Both Typical Meteorological Year 2 (TMY2) and Weather Year for Energy Calculations 2 (WYEC2) closely matches the long-term average climatic conditions. Our app includes more than 2100 weather data radially available for your use.
Getting the historical wind data for the location of the site is very essential. Our app uses the weather and wind data to process and calculate the variation of velocity and pressure around the building site. Using these values of velocity and the wind frequency occurrence pattern, we determine the pedestrian comfort around the buildings.
We have integrated a map for easy access and visibility of the site location. You can easily select the location of your site simply by typing the name of the location in the search bar. Our app will readily display you all the weather station within 80 miles radius of your location. You may select any one of the weather station and we shall gather all the wind data from the respective weather station.
The first step is to provide location and select the weather station data to be used for simulation. Click on Location & Wind Rose menu to open the sub menu.
To provide the location and search for nearby weather stations, do following:

1
Location details
:
Start typing the location of your site in the search box. All matching locations will be shown in the drop-down. To get correct location, include city, state or zip code of the location.
2
Search location
:
Click on either search button or a location in a drop-down. Once the location is identified, its longitude and latitude will be shown in "Site Location" section. A home icon will be added to the map.
3
Confirm location
:
Click on the longitude and latitude to display the location details 4 on the map. Zoom in the map to confirm the location. You can drag the home icon on the map to fine tune the site location. The longitude and latitude values will be automatically updated.
Weather station
Once the site location is found, the next stage to search and select nearby weather station. Do following to see available weather stations and select weather station:

1
Search weather station
:
Click on "Search Stations" button to see if there are any nearby weather station data available. Pedestrian Comfort Analysis app has more than 2100 weather station data available. All weather stations within 80 miles radius from site location will be displayed in "Weather Station Conditions" section. The weather station location icons will be added on the map.
2
Weather stations
:
If there are more than one weather station in 80-mile radius from site location, all stations will be listed. The weather stations will be arranged in increasing order of its distance from site location. By default, the closest weather station will be selected for analysis (indicated by blue color). The selected weather station will be highlighted with blue location icon on the map.
3
Weather station data
:
Click on the weather station to see its details. Weather station details information will be opened near to station marker on the map. The details include station ID, name, country, and data source. The selected station will be marked with red location icon on the map.
4
Wind rose
:
Click on "Open Wind Rose" button 5 in weather station details dialog. This will open the wind rose dialog 6. A "wind rose" diagram is the most common way of displaying wind data. The wind rose represents how wind speed and direction are typically distributed at a location. The wind rose is divided in a number of sectors in each direction. Each sector represents the speed and frequency of its occurrence in that direction. The color coding used to draw wind rose is displayed on right. You can mouse over on any sector to see the velocity and occurrence frequency.
7
Change or apply weather station
:
App will select nearest weather station data by default. If you want to change the weather station, click on weather station you want to select. The selected station will be marked with red color marker on the map. You can view the details of wind conditions using "Open Wind Rose". Once the weather station is selected, "Apply" button will be activated. Click on "Apply" button to change the weather station. The newly selected weather station name and its marker will be highlighted with blue color.
Wind conditions and atmospheric boundary layer
Pedestrian comfort plot is a combination of aerodynamics data around a building, average wind velocities and frequency of occurrence and comfort criteria. The accuracy of comfort plot depends on number of wind directions considered for aerodynamic calculations. It is recommended to consider minimum 8 directions for aerodynamic calculations. Pedestrian Comfort Analysis app allows a user to select minimum 4 to maximum 32 wind direction.
Click on Wind Conditions for Simulation menu to open the sub-menu. To provide wind directions for simulations, do following:

1
Wind rose
:
Wind data is taken from the selected weather station. Click on "Show Wind Rose" to see wind rose for the selected weather station. This will show wind rose for 32 directions 2.
3
Number of conditions
:
For pedestrian comfort analysis, multiple wind directions need to be considered for calculating aerodynamics data at the site location. Multiple conditions is default selection for pedestrian comfort analysis.
4
Level of study
:
The accuracy of comfort analysis depends on a number of directions selected for aerodynamics analysis. You can select anywhere between coarse to finest accuracy. With coarse accuracy, only 4 directions are considered and for finest accuracy, 32 wind directions are considered. It is recommended to start with a medium level of study during the initial design phase. Once the location and orientation of building mass are fixed, the final study can be conducted with the finest accuracy. Select the desired level of study from select level dropdown 4.
5
Wind condition details
:
Based on the level of study selected, number of wind conditions and their details are shown in a table. To increase the accuracy of the solution, pedestrian comfort analysis app selects the conditions based on its frequency of occurrence. Preference is given for most occurring wind direction. For example, if medium accuracy is selected, app selects most occurring 8 wind directions. At bottom of table, selected wind conditions and total coverage the percentage is shown. Total coverage % is a summation of frequencies in selected individual directions and indicates the overall accuracy of pedestrian comfort plot.
6
Select conditions
:
Once you have selected level of accuracy, click "Save Condition Data" to apply these conditions for pedestrian comfort analysis study. Once the conditions are saved with your setup, the button will be disabled. Changing the conditions will again activate the button.
Once the number of wind directions is selected for analysis, you need to provide incoming wind exposure. Meteorological data at weather station is generally measured in flat, open terrain without any obstruction. The wind conditions at actual site location depend on its surrounding. The model from the ASHRAE Handbook - Fundamentals [2005], (16.3 "Airflow around Buildings") is used to obtain the wind speed (u) profile with height (h) at given site location. The exposure is defined in four categories, country, suburban, city, and sea. Country exposure represents open terrain with scattered obstruction, typically observed in meteorological station surrounding. Suburban exposure represents wooded area or terrains with closely spaced obstructions. City exposure represents large city centers with 50 % of buildings higher than 21.3 m over 0.8 km distance. Sea exposure represents flat, unobstructed areas exposed to wind flowing over water.
You can select the wind exposure in number of directions using interactive dial overlapped on a map. Each wind exposure is presented with the unique color in a dial. Do the following to provide incoming wind exposure:

1
Default wind exposure
:
Default wind exposure for all direction is considered as country representing the conditions observed around a weather station.
2
Wind exposure dial
:
Click on "Set Wind Exposure" to open the wind exposure dial 3. The dial will be opened with site location as center on the map. Overlay of the map helps to identify what wind exposure needs to be given in each direction. Notice that all direction wind exposure is colored with a green color representing country exposure.
4
Select directions
:
Wind exposure dial is divided into 32 sectors. Left click on any sector to select the sector. If you want to define wind exposure for multiple directions, left-click the section and drag in clockwise / anticlockwise direction. This will select multiple sectors. Selected sectors will be highlighted in black color.
5
Select wind exposure
:
Right-click on any of the selected sector to open wind exposure options. Click on desired wind exposure to apply that exposure to selected directions.
6
Set wind exposure
:
Once the wind exposure is applied, the selected direction will be highlighted with respective wind exposure color. The exposure will be also updated in the wind exposure table.
7
Apply wind exposure conditions
:
Continue selecting the wind directions and wind exposure based on your requirement. Wind exposure dial and table will be updated based on your selections. Once you set desired wind exposure for required directions, click "Apply" button to save the setup. This wind exposure setup will be then considered for simulation. You can click on "Cancel" button anytime to close wind exposure dial.
Pedestrian comfort and safety criteria
Comfort is truly a relative term and governed by the activity of pedestrian. The comfortable wind around pedestrian running, might feel uncomfortable for one standing or sitting at a place for a long time. The behavior of pedestrian and their expectations about comfort and safety is studied for many years. The standard criteria used to judge the acceptability and safety of the pedestrian level wind are developed. There are many city level criteria and globally accepted comfort and safety criteria.
Most of the comfort criteria are specified for the set of pedestrian activities like sitting, standing, leisurely walking, fast walking and uncomfortable. Pedestrian Comfort Analysis app has all major comfort criteria used for evaluating pedestrian comfort and safety. You can get the pedestrian comfort plot using Lawson, CSBT, BLWTL and NEN 8100 criteria.
To select the comfort criteria for pedestrian comfort analysis, do following:

1
Comfort and safety criteria
:
Click on Comfort & Safety Criteria on the main stage. This will direct you to sub-stage menu for comfort & safety criteria.
2
Select criteria
:
Click on "Select Criteria" dropdown to view available comfort criteria. Select the desired comfort criteria from the list.
3
Comfort criteria details
:
Once the comfort criteria is selected, details of each class including velocity and frequency threshold are displayed in a table.
4
Apply criteria
:
Click on "Apply Criteria" button to consider the selected criteria for evaluating pedestrian comfort and safety conditions.
Run simulation
Pedestrian Comfort Analysis app uses cloud computing for all calculations. Pedestrian comfort analysis needs multiple numbers of simulations depending on comfort plot accuracy selected in "Wind Conditions for Simulation" stage. For example, with medium accuracy, total 8 number of simulation will be carried out.
To submit the simulation run and check status, do following:

1
Simulation run
:
Click on "Simulation Run & Status" in main simulation run stage. This will direct you to sub-stage menu for a simulation run.
2
Submit simulation
:
Click on "Submit Simulation" to submit the simulation on cloud simulation facility. This will open "Run Simulation" dialog. The dialog shows the available credits required simulation credits to run the simulation. Click on "Run Simulation" 3 to submit the simulation run. The status of a job submitted will be shown in "Simulation Status" section. Job submission and completion email notifications will be sent. The time required for simulation depends on the size of geometry and number of simulations submitted. Live feed of current simulation status will be given in "Simulation Status" 4 section. Status of individual simulation will be updated in "Simulation Run" section. Once the simulation run is completed, the 3D viewer will automatically move to results stage and simulation run stage will be marked as completed (blue color).
For any reason, if you wish to terminate simulation, you can use "Terminate" 5 button. It will show a job termination popup.
Pedestrian comfort and safety plot
Pedestrian comfort and safety plot displays the distribution of pedestrian wind comfort and safety around the site based on the selected comfort criterion. Using the comfort plot, we can determine which regions around the site are suitable for specific pedestrian activities and which regions create a distress or are dangerous.
The comfort plot is created based on comfort criteria selected during setup. The comfort criterion has distinct classes which mention the type of pedestrian activity allowed, its velocity and frequency thresholds. A specific color code is given to each class. A color plot is generated with distinct class colors to identify the reason satisfying a pedestrian activity. For example, a region marked in blue color represents a region for sitting / standing for a long time.
To access the pedestrian comfort and safety plot, click Comfort Plot in result main stage. You can also access the comfort plot using "Results quick access menu" provided at the top center of the 3D viewer.

Comfort plot is loaded with the default configuration of plane height, class visibility, and opacity. Use following settings to modify the display of comfort plot.
1
Comfort plot plane
:
Average pedestrian height depends on geographical locations. The guideline for pedestrian comfort plane height depends on code and regulations followed by a country / locality. Considering most acceptable plane location, currently, the comfort plot is extracted at 1.6 m height from the ground. In future, a different plane location will be given as a choice.
2
Class color coding
:
A distinct color is given to each class in selected comfort criteria. This color coding is shown in the class color table and a color legend shown at the bottom right corner of the 3D viewer.
3
Class visibility
:
Sometimes it is necessary to see the region satisfying a single / few comfort or safety classes. For example, we may need to see only the region suitable for long sitting or standing purpose or we may need to see the only area marked dangerous for any pedestrian activity. You can use / icons in front of an individual class to control the visibility of that class. You can use / icons in the table header to hide/show all comfort classes.
4
Wind conditions
:
Expand the "Wind Conditions" section to get details about what conditions are used for simulation. Details like selected accuracy and number of conditions are shown. Click on View Conditions button to see the velocity, direction and occurrence frequency of each condition.
5
Model opacity
:
By default, the model has full visibility. You can change opacity settings using slider provided in "Model Opacity" section with 0 indicating fully transparent and 1 indicating fully visible. In case if you have a multi-part model, you can change the opacity of one / more parts. Check the "Selected Only" option, select single / multiple parts and drag the opacity slider. Drag and release the slider at desired opacity to change the opacity of model. Click "Reset" button make model fully visible.
6
Take a snap
:
Click (Set simulation image) button located in a menu at mid-bottom of the viewer. This will open a "Take a Snap" dialog with image preview. "Set as simulation feature image" option will make the snap as simulation feature image display on dashboard and simulation details page. "Add in simulation repository" option is used to keep the snap in simulation data for future reference.
Flow lines
Flow lines depict the path followed by fluid particles around buildings. This is similar to the flow visualization technique where some colored particles are injected from wind upstream direction and its trace around the building is marked. Along with the path, the flow lines also display the magnitude of velocity and pressure of each particle along its path. This is useful information to identify flow separation and recirculation around the buildings.
To access the flow lines, click Flow Lines in result main stage. You can also access the flow lines using "Results quick access menu" provided at the top center of the 3D viewer

Flow lines are loaded with the default configuration of wind direction, variable, colors, and opacity. Use following settings to modify the display of flow lines:
Usage of 2 Model opacity and 4 Take a snap is same as that of comfort plot results.
1
Variable
:
Select the variable to be used to color flow lines. You can select either velocity or pressure as a variable. You can also change the number of color bands to be used to create the color variation. By default, variable variation is shown using 16 colors. Anywhere between 2 to 100 colors can be used as a color variation. Change the variable, change a number of colors and click "Apply" button. This will apply selected changes on the colors of flow lines.
3
Color legend
:
CFD analysis generates a numerical data as a result. Understanding large quantity of numbers is very difficult. To give a better understanding of results and to create a visual representation of numbers, a color coding method is used. The range of minimum to the maximum value is first divided into the number of groups (In simulationHub, we divide them 2 to 100 groups). Each group is then assigned a unique color. Any number then gets a color based on which group it belongs to. In simulationHub, we use a color variation between blue to red where blue indicates a minimum value and red indicates a maximum value. The color legend shows the minimum and maximum value, variable displayed and color for each group.
5
Change wind direction
:
In a typical pedestrian comfort analysis, number of wind directions are considered for building aerodynamics calculations. Number of directions depends on comfort plot accuracy selected in "Wind Conditions for Simulation" stage. For example, with medium accuracy, building aerodynamics results are available for 8 different wind directions.
Pedestrian comfort plot is a single plot generated considering all wind direction aerodynamics results, weather data and comfort criteria. Other building aerodynamics results like flow lines, flow lines with vectors and contour plots are available for each wind direction considered for aerodynamics calculation. You can view and analyze these results to see how each direction wind flow is behaving around the buildings.
By default, flow line results are displayed for one wind direction selected based on velocity and frequency of occurrence. To see flow lines for other wind direction, click on "Select direction" drop-down, select a desired wind direction from the list and click "Apply" 6 button. This will display the flow lines for selected wind direction.
Flow lines with vectors
The flow lines can be animated using arrows. The direction of an arrow indicated flow direction and speed of arrows is based on velocity magnitude. This helps to understand the relative velocity difference at the different location around the buildings.
To access the flow lines, click Flow Lines with Vectors in result main stage. You can also access this using "Results quick access menu" provided at the top center of the 3D viewer.

Flow lines with vectors are loaded with the default configuration of wind direction, variable, colors, and opacity. Use following settings to modify the display:
Usage of 1Variable, 2Model opacity, 3Color legend, 4Take a snap and 5Wind Conditions is same as that of comfort plot and flow lines results.
6
Settings
:
Flow line arrow animation speed can be changed using speed slider located in the settings section. Speed can be adjusted anywhere between 1 to 100, where 1 results into slowest and 100 results into fastest animation speed. Drag and release the slider at desired speed to change the speed of arrow animation.
Contour plots
The contour plot is a pictorial representation wind velocity and pressure variation around the buildings. The location of flow separation, high velocity, and low-pressure regions are few examples of insights that can be gained through CFD results visualization. Contour plots display the velocity or pressure variation about any 2D cut section around the buildings.
To access the contour plot, click Contour Plots in result main stage. You can also access this using "Results quick access menu" provided at the top center of the 3D viewer.

Contour plots loads with default settings for wind direction, cut plane location, variable and model opacity. Use following settings to modify the contour plot.
Usage of 1Variable, 2Model opacity, 3Color legend, 4Take a snap and 5Wind Conditions is same as that of comfort plot and flow lines results.
6
Cut plane
:
Contour plots can be shown in X, Y, or Z direction. To change the cut section direction and location, sliders are provided in "Cut Plane" section. You can change the plane location from 1 to 100 where 50 represents the middle cut section.
By default, Z = 50 cut section is displayed. The displayed cut section value and direction is shown at the bottom. To change the cut section, drag and release the slider at the desired location.
Pedestrian comfort and safety report
Pedestrian comfort and safety analysis report is the most critical for an architect, environmental engineer and the urban planner. The report is necessary to submit it to local approval authority, to stakeholders, site owners and builders for further discussion, to design team for review and design modifications.
Pedestrian Comfort Analysis app comes with a unique report generation feature. We have extracted required and critical information about analysis to compile a ready-to-use PDF report. The report begins with an introduction and the objective of the study of your project. The following section includes all the weather and wind data, CAD model data, location details, wind condition details, wind exposure details and information regarding the comfort criterion. The CFD section gives you information extracted fluid domain, generated mesh properties, information regarding the solver, properties of fluids and certain assumptions made during the analysis. The final results section displays a comfort plot and velocity contour plots in all the selected directions.
To access the pedestrian comfort and safety analysis report, click Report in result main stage. This will open a PDF in a report window. You can download the report using download button provided in the top right menu.

Dashboard

Once you log into the simulationHub account, you can go to your dashboard using a link in top navigation bar. The dashboard provides an at-a-glance view of all your simulations. The dashboard contains main components like top navbar, side navigation, simulation quick-view tile and other important information about your account and subscription.
Simulation quick-view tile on the dashboard has following components:
1
Simulation image
:
The simulation image on dashboard tile gives a quick visual view of simulation. This image is automatically updated based on the recently opened / completed simulation stage. You can also set this image using "Set simulation image" button available in 3D viewer. Click on the simulation image will open simulation in 3D viewer.
2
Simulation details
:
Simulation details section in quick-view tile contains information link simulation name, simulation app and last opened / edit information. But default all the simulations are arranged in descending order of its last access time.
3
Simulation status
:
Simulation status is the dynamic content of quick-view tile. The progress percentage, status and progress bar will change based on the current state of the simulation. Appropriate color coding is used to give the visual representation of simulation status.
4
Quick links
:
Quick links are provided to open details page or 3D viewer for simulation.
Simulation details

Simulation details page contains all the information either entered by you or generated during the simulation process. We have written app specific algorithms to extract all the simulation information and presented in a report ready format.
Following are the major components of simulation details page.
1
Name and details
:
Simulation name and details are provided at the top
2
Simulation image
:
The image slider contains all the simulation images. These images are automatically updated based on the recently opened / completed simulation stage. You can also set this image using "Set simulation image" button available in 3D viewer.
3
Simulation details
:
The simulation details section contains all input information including name, description and site location. The details section also includes information about weather data, comfort criteria and wind conditions selected for simulation. The simulation results information is arranged in different sections. It includes image sliders for specific output like comfort plot, flow lines, contour plots etc. You can collapse the view of each section using the arrow provided at the top right corner of each section.
4
Simulation actions
:
Simulation action section provides buttons to preform different actions on the simulation. You can open 3D simulation, copy, edit or delete the simulation using these buttons.
5
Quick glance
:
Quick glance section contains some important information about simulation. It includes simulation details, overall simulation status, simulation images and important notifications about the app.
6
Left navigation toggle button
:
This button toggles the left navigation menu. Left navigation menu contains simulation filter (recently opened / filter by app / simulation gallery), help and support section and account section. You can access app specific help or raise a support ticket for your simulation.
6
Profile and help
:
In profile, you can control your profile and account settings, or use the help menu to continue your learning or get help in troubleshooting. This menu also contains a quick link to the dashboard. Use full-screen icon if you wish to use the app in full-screen mode.
Mobile device modifications

A profile and help menu 7 is modified for mobile and tablet devices. You will see raise ticket and sign out buttons in the profile and help menu.
Want to know more?
Want to know more about Pedestrian Comfort Analysis App? Visit blogs and simulation gallery to get details of real life applications or simply schedule a demo with our expert.
Blogs
Read about an application of Pedestrian Comfort Analysis app for comfort design in an urban environment. Find out the views and opinions on design trends in an urban environment.
View blogs
Case studies
Pedestrian Comfort Analysis app is used to design, develop and optimize building mass design in an urban environment. Read the real-life case studies about how the app is used to improve pedestrian comfort.
Simulation gallery
Request demo
It's easy. It's powerful. It's built for designers. Learn how simulationHub apps can help you optimize your own product design. Schedule a one-on-one demo with a simulationHub expert.
Request demo